> [!warning]
> This post was originally published in 2023. The website designed described has since been migrated to the site you are using today, which uses [[Obsidian Publish]].
Creating a website is easy. Most people can Google “how to create a website” and have one up-and-running before the end of the day. Someone who takes this approach would look at the end result and state, “I understand how to create a website”. I’d like to challenge that notion.
A recurring theme in my personal and professional projects is challenging myself to truly _understand_ topics. Richard Feynman (the Nobel Prize winning physicist) believed there is a difference between “knowing the name of something” and “[[knowing something]]”. To truly know something, you must be able to explain its various components and how each of those components work in simple terms. This will be my goal as I embark on all of my future projects.
So, when I decided I wanted a website to document and challenge my understanding of my interests, I did not simply need to create a website. I needed to build a website and understand how it works (within reason, of course). And – here we are! You are now experiencing my first documented “technical project”, my website. Let’s see how we got here.
### Value Objectives
What is the purpose of this project? I try to avoid exploring technology for the sake of exploring technology. While those types of exercises does give you familiarity, I believe it is the ability to apply that technology to something that provides value that truly sets someone apart.
For my website, the value objectives are straight-forward:
- **Provides a location to document my personal projects** – often I will work on something and years later try to remember what I did or why I did it. By documenting my future projects on this website, I can always have a reference point to prevent rework in the future.
- **Sharing my interest with others** – in my opinion, typical social media platforms only let you show your interests with friends, family, and peers at a surface-level. My website will provide a depth to my interests that provokes more thoughtful sharing and conversation.
- **Learning** – I could list this item in every value objective statement moving forward, but I’ll only use it this once. This provides me an opportunity to learn, challenge myself, and enjoy an end product.
### Requirements
There are three main criteria I had in mind when starting to build my website.
1. **Balance Between Maintainability and Customizability** – these two topics typically sit on opposite ends of the scale. I want a solution that goes deeper than creating a website through a web interface, so I can learn new concepts. But, I also want a solution that has fairly low maintenance since this project will be running for (hopefully) years to come, and I would like to keep my time open to explore new areas.
2. **Cost** – it is key to keep costs low and detect instances of increased costs.
3. **Exposure to AWS** – while building my website, I was also studying for the AWS Solution Architect Associate (SAA-03) certification, so I really wanted some exposure to AWS services to further support my studying. I still considered non-AWS approaches, but anything that was AWS native was a huge plus.
### Project Overview
Before diving into the various approaches to consider, let’s first understand the basic architecture of a website. This way, we know where there are decision points.
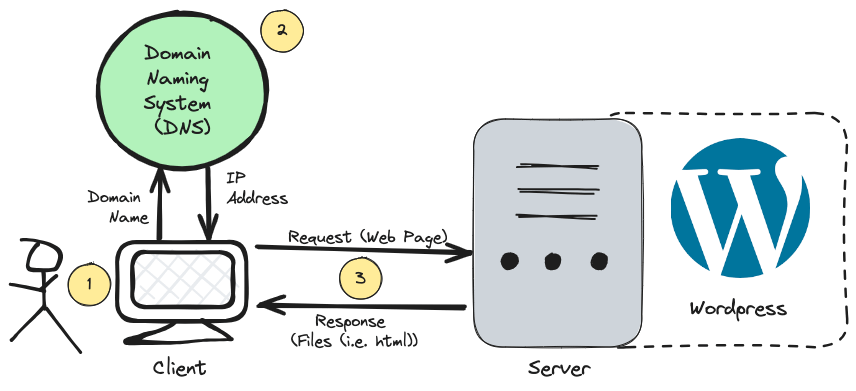
There are three high-level steps to have a basic understanding of how a website works. Each of these steps could contain much more detail, but this post will cover enough to complete the project.
First, a client (i.e., you) types in the name of a website in your browser. Next, the domain name you type (i.e., www.ryanlynch.org) is converted into an Internet Protocol (IP) address using the [Domain Name System (DNS)](https://www.cloudflare.com/learning/dns/what-is-dns/). While the domain name typed into the browser is great for humans, it is difficult for computers to interpret. Thus, the conversion to an IP address (such as, 1.1.1.1) allows the computer to find which server holds the information for the website that was requested. For a website to use DNS, the domain name must be registered via a Domain Registrar (more on this later).
Finally, once an IP address is in-hand the client sends a request for the webpage to the server assigned that IP address. The server will send back the files needed to display the page on the browser and the client can view the page! The capability provided by the server is referred to as “web hosting” for hosting the file of the website.
Additionally, the server may run software associated with the website. Many websites use a software called [WordPress](https://wordpress.com/) for creating websites. WordPress allows you to use a user interface for creating a website, rather than manually creating files which hold your website and coding up the design from scratch. It also offers many, many other functionalities through plug-ins.
### Approaches Considered and Tradeoffs
#### Web Hosting
The most important decision for my website is to determine how it will be hosted.
| | | | |
|---|---|---|---|
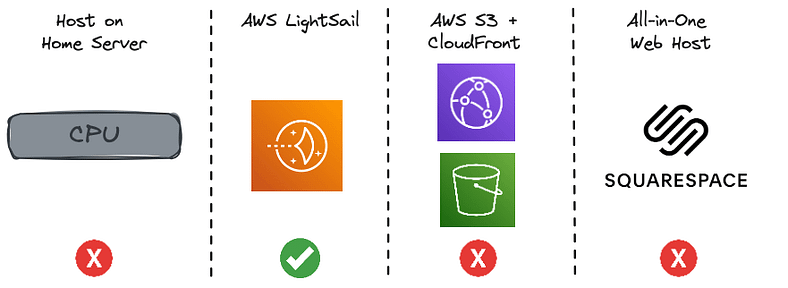
|**Host on Home Server**|**AWS LightSail**|**AWS S3 + CloudFront**|**All-in-One Web Host**|
|Highly customizable, but requires 100% maintenance; may have security vulnerabilities|Abstracts away any server maintenance, but still have full control over website installation|Requires Elastic Cloud Compute (EC2) to install WordPress, which adds maintenance|Does not give required customizability|
|Cheapest Option|More expensive, but cheap given personal website use case|Pay-as-you-use; most likely cheaper than LightSail|More expensive|
|Does not use AWS|Uses AWS|Uses AWS|Does not use AWS|
In the end, I selected AWS LightSail. It offered the ideal balance between maintainability and customizability for me. It allows me to get as deep into the “server-side” implementation as I wish, since I have command line access to the server, but all maintenance activities are managed by AWS. This does come at a slight cost premium, but was worth it given my limited time.
### Implementation Details and Deep-dives
##### Domain Name
For my domain name, I chose to register through AWS’ Route 53 service. Route 53 is an AWS service that acts as both a Domain Registrar and a feature-rich DNS service. At this point, I only required the domain registration functionality, but by registering with Route 53 I have the option to take advantage of easier integration with other AWS services in the future. Other options for registering a domain name included SquareSpace and GoDaddy.
One key step for creating a trustworthy website is to enable HTTPS for your website, which is related to the request / response step 3 of our basic website flow above. There are various protocols used for communication between machines – WebSockets, gRPC, TCP, UDP… but the most popular for web pages are HyperText Transfer Protocol (HTTP) and HyperText Transfer Protocol _Secure_ (HTTPS).
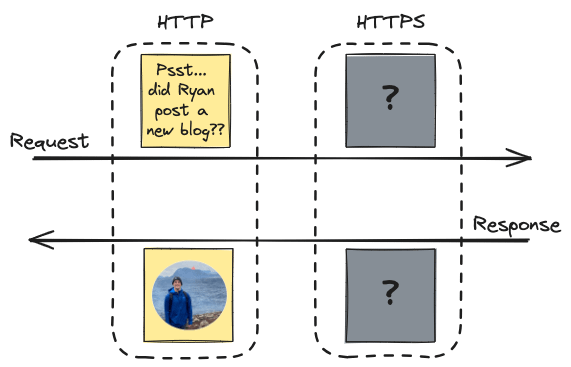
The purpose of HTTPS is to securely transport data between the client and the server. This way if there are any bad actors that intercept the request or response they cannot see the actual contents of the data. This is completed through a method of encryption called Secure Sockets Layer (SSL) or Transport Layer Security (TLS). TLS is an updated version of SSL, but you’ll often see the terms paired or used interchangeably.
The exact details on how SSL / TLS works is beyond the scope of this post, but I will “shake” on it that I will cover it in the future (this is a joke that will make sense after that future SSL / TLS post).
##### AWS Lightsail and Billing
While AWS Lightsail was more costly than other options, it also offers tools to ensure that my costs don’t exceed values outside my comfort zone. [AWS Budgets](https://aws.amazon.com/aws-cost-management/aws-budgets/) is a tool that allows you to establish budgets and get alerts when you are approaching or exceed them. You can configure AWS to take actions based on these limits. While AWS Lightsail was more costly, this tool will at least ensure I do not spend more than I would like while operating my website.
##### WordPress
WordPress is an extremely popular software used to build and manage websites. There are some folks who make an entire career using their deep WordPress knowledge to build and maintain customer websites. For my purposes, I just needed to know enough to understand _how_ it works from a _technical_ perspective and _how_ I can properly use the _functionality_ to create a website.
**Technical Concepts**
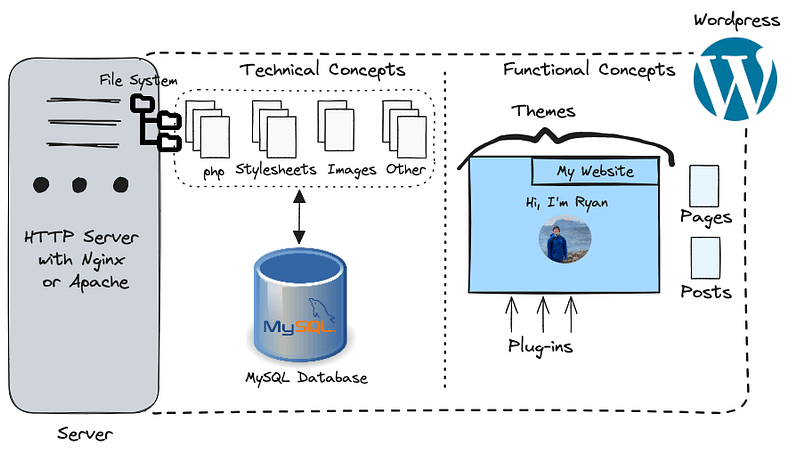
- **Files** – a website is a collection of static and dynamic content stored on files. These file are stored on the underlying file system of the server hosting the website. A file system is a way for storing data in the form of files. They often use a hierarchical relationship where files can be nested within folder structures.
- In the case of WordPress, one of the key types of files are `.php` files. PHP is an open-source, server-side scripting language used for web development. Open-source means there is an open community that develops and maintains the language for free. Server-side means it renders / processes on the server, rather than on a client (i.e., a browser cannot understand the language). PHP is often embedded in HTML for dynamic web development.
- **MySQL Database** – in addition to files, there is some data that WordPress needs to persist (i.e., store in a manner where it is physically on a piece of hardware and the data will ideally stay there until deleted). Out-of-the-box WordPress uses a MySQL relational database for this database persistence. It is used to store things such as user names, content (posts, pages, etc.), comments, and more.
**Functional Concepts**
- **Themes** – provide the foundational format, style, functionality, etc. when you create a WordPress website. It is important to select the right theme for your use case. Also, some themes may perform (i.e., load) better than others, or have bugs. Currently, my website uses the [Neve](https://wordpress.org/themes/neve/) theme.
- **Pages vs. Posts** – creating content for your website comes down to creating a post or a page (although, there are other custom post types).
- _Pages_ are static (i.e., not associated with a date or time) and are permanent fixtures on the website. The links at the top of my website (Home, Projects, Home Automation, etc.) are pages.
- _Posts_ are pieces of time-based content on a website. They are what you probably think of when you hear the term “blog post”. You are currently reading a post.
- **Plug-ins** – on the verge of a technical concept, plug-ins are pieces of add-on software you can download onto your WordPress instance to perform many different functionalities. Some functionalities on my website that use plug-ins are cacheing, reCAPTCHA, and image compression. Each of these were added to make my website faster or more secure. Keep in mind, you do not want to download too many plug-ins. An excessive number of plug-ins will slow down your website and WordPress instance.
##### Key Results
In the end, I am very happy with my website for an architectural and functional perspective. It is performant and meets all of my initial requirements. In the future, I would like to explore:
- **Web Design with Help** – I am not a web designer, not will I ever be. I enjoy working in the less glamorous depths of data. It would be great to have a trained eye refresh the look and feel of my website beyond the basic design I’ve implemented.
- **Migrate off AWS Lightsail** – my AWS Lightsail instance is perfect for my quick start and low maintenance needs. I’m currently interested in exploring many topics and wanted to get my website up and running. At some point, though, I’d love to explore other options for hosting my website that may have less cost.
#### Tags
#blog-post #technical-project